
I have been really interested and very pleased in the knowledge that my recipe posting of gluten free shortcrust pastry has drawn a lot of interest. Encouraged, I have been having a play with another gluten free pastry recipe with my own tweaks on it and am pleased to say I have had very good results. This recipe does call for a number of different gluten free flours which may come as an inconvenience to some (the above mentioned recipe uses only one kind of flour that is readily available in the supermarket). Sourcing these flours will require some shopping at healthfood type outlets and some of the flours don’t come cheap, such as chestnut flour. However, I’d encourage you to give this one a go as I managed a lovely and crispy result; an outcome difficult to achieve given the gluten free context.
I have tried using either butter or margarine and found the best result from margarine as it resulted in a more pliable dough, making the pastry easier to work with. The amount of water you need to add differs slightly; more is called for if using butter than if using margarine. I have given an indication of what I think are the appropriate measurements if using butter in the ingredients list below.

Recipe calls for these flours
Ingredients
60g chestnut flour
60g garam flour
200g tapioca flour
40g rice flour (can be brown or white)
130g butter or margarine
¼ tsp salt
1tsp xanthum gum
1 large egg , beaten (approx. 60g in weight)
Water: approx. 50ml if using margarine or approx. 60ml if using butter (approximate is given here as it depends on the weight of your egg. See instructions in the method below.)
Method
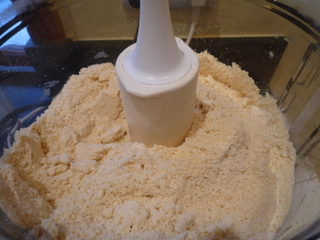
Measure out the flours and salt and either put them all in a food processor or into a large mixing bowl. I find using a food processor gives a nice fine crumb than rubbing in by hand.

Put all the flours and salt and butter into the mixer
Measure out the butter and cut into small cubes and add to the flour. If using a food processor, pulse until it resembles very fine crumbs. If not, then rub in the butter with your hands until you get to as fine a crumb mixture as you can.
Mix flour and marg or butter until mixture resembles fine crumbs
You now need to weigh your egg. Break the egg into a small bowl that is set on some scales. Your large egg should weigh about 60g (without the shell!).
Your total liquid content needs to be 110ml if using margarine and 120ml if using butter. If your egg weighs 60g, then you need 50ml of water. If your egg weighs 70g, then you need 40ml of water, i.e. subtract your egg weight from 110 (the total liquid amount) and the remainder is the amount of millimetres you need for water.
Add the beaten egg to the flour mixture and pulse to combine or mix in by hand.
Add the water and either pulsing the food processor or hand mixing until all incorporated.

Add egg & water & pulse till mixture starts to come together
Test that you have added enough water by pinching a small amount of the dough with your fingers to see if it combines easily into a lump. If it doesn’t add a little more water; gluten free flours tend to absorb more liquid than normal flours. If your dough is too dry, it will be even more difficult than normal to roll out the pastry as it will crack and break up very quickly and easily.

Add sufficient water so that it starts to bind when you press it together with your fingers
If you are using a food processor, empty the dough either into a bowl or onto the work surface and combine the dough into a ball.

Using your hands start to draw the mixture together into a ball

Lightly dust the work surface with some rice flour and roll out.

Lightly flour worktop with all purpose gluten free flour or rice flour
You need to be very patient with this pastry as it does crack and break easily. Roll from the centre of the dough out to the edge then turn a quarter and roll again continuing to quarter turn.

Roll out pastry

Use your hands or spatula to quarter turn the pastry as you roll it out
With each turn, you will also need to press together any cracks to get as smooth an edge as possible. You might need to use a large spatula to lift and turn the dough as it gets larger.

Use fingers to push together any cracks that appear at the edges
Once it’s the right size, gently roll the dough onto the rolling pin. Don’t worry about the pastry cracking at this stage.

Carefully lift pastry onto rolling pin – don’t worry about cracks
Lift the pastry over the tin and fold it out into the tin.

Lift pastry over tin and unfold over tin
Again, don’t worry about cracks and breaks as these will get patched up later.

Don’t worry about any cracks as pastry unfolded over tin

Once the pastry is in the tin, gently push the pastry into the bottom and sides of the tin using your fingers or knuckles to get into any difficult corners.

Use knuckle to gently push pastry into folds of tin
Using a sharp knife, trim the pastry off flush to the edge of the tin.

Using a sharp knife, cut off excess pastry flush wIth the tin
Using the cuttings, fill in any cracks or breaks as appropriate. You can use a little bit of water on your finger to help repair any cracks.

Use your finger to work in all the cracks in the pastry
The pastry case is now ready for baking or it can be kept in the fridge covered with cling film until required.

Pastry case ready for baking
Baking the pastry
Heat the oven to 190C
The pastry case needs to be baked blind. To do this, take a square of baking parchment large enough to line the tin and have at least an inch rising up over the top edge of the tin. This helps lifting the baking beans out of the pastry case later.
Scrunch up the parchment in to a ball and then open it out and place into the pastry case tucking it gently into the corners.

Scrunch up the baking parchment

Unfold the parchment and line the tin
Fill the lined case with baking beans and place the tin on a baking sheet. I find this makes handling the tin easier and also, should you happen to have any cracks in the pastry that causes the filling to leak, it will catch the leaks and not drip all over your oven.

Add baking beans to lined pastry case
Bake for 5 mins.
Remove the baking beans and parchment linking from the pastry case.
Using a pastry brush, baste the pastry case all over with egg wash. This helps to seal the pastry and prevent soggy bottoms!

Egg wash to baste pastry

Ensure you get in the corners with the egg wash
Put back in the oven and bake for a further 4 mins – any longer and I have found that the pastry will begin to crack severely.
Remove from the oven and check for any further cracks. Baste any cracks with egg wash again and put back in the oven for only a minute to dry off.

Rebaste partially cooked pastry with egg wash to fill any cracks
The pastry case is now ready for filling according to your recipe.
Here are a couple of pictures of a smoked fish tart I made with the pastry case:

Gluten free smoked fish tart

Gluten free smoked fish tart
This is great, am always looking for gluten free recipes and this is so detailed I feel I can’t go wrong.
Thanks for the comment. Do give it a go and let me know how you get on with it.